UPDATE!
The Rust Compiler now has native support for compilation to WebAssembly without Emscripten! Most of the info in this post is no longer relevant. For an amazing and up-to-date resource on Rust and WebAssembly, check out the Rust and WebAssembly Book.
I’ve been seeing a lot of really cool #wasm (WebAssembly) stuff on Twitter and Hacker News lately, but I didn’t know much about what it is exactly, or how to start using it. Because it is so new — only being enabled in Chrome last March — up-to-date guides are few and far between. After struggling through getting something to run, here’s what I’ve learned:
WebAssembly is a cool new binary format and compile target for the web. That means you can compile languages like C, C++, and Rust to .wasm files and execute that code in your browser. In most cases, the resulting code is significantly faster and smaller than Javascript.
This guide will walk you through setting up Rust, WebAssembly, and Webpack in a typical JS web app. The goal is to be able to execute low-level Rust code in the browser alongside the Javascript you know and love (or hate).
Note: These technologies are constantly changing. This guide is using:
- webpack 3.0.0
- cargo 0.19.0
- emcc 1.37.13
Here is the finished project. If you run into a problem, let me know with an issue or PR 😊.
![]()
What you will need
Follow these links to install:
Install the Emscripten Rust compiler
Install the WebAssembly Emscripten compile target for Rust:
$ rustup target add wasm32-unknown-emscriptenInstall cmake. This varies depending on your platform, choose the option right for you or see the install page for more options:
$ brew install cmake                  # MacOS, brew
$ sudo port install cmake             # MacOS, MacPorts
$ sudo apt-get install cmake          # Debian Linux
Install the Emscripten SDK. This is going to take a while (~2 hours for me).
Note: If ./emsdk update or ./emsdk install give you errors, it may be that Python3 is your default Python. Try installing Python 2.7 and replacing ./emsdk … with python2.7 emsdk …
$ cd ~
$ wget [https://s3.amazonaws.com/mozilla-games/emscripten/releases/emsdk-portable.tar.gz](https://s3.amazonaws.com/mozilla-games/emscripten/releases/emsdk-portable.tar.gz)
$ tar -xvf emsdk-portable.tar.gz
$ cd emsdk-portable
$ ./emsdk update
$ ./emsdk install sdk-incoming-64bit
Next, we’ll need to add the following directories to our PATH environment variable:
~/emsdk-portable
~/emsdk-portable/clang/fastcomp/build_incoming_64/bin
~/emsdk-portable/emscripten/incoming
Reload the terminal, then run emcc -v to check that the Emscripten compiler is installed.
Compile and load Rust with Webpack
Let’s create a Rust/Javascript hybrid project:
cargo new tutorial --bin --vcs none
cd tutorial
npm init        # You can just hit enter for every option
We need to install webpack, http-server to serve our content, and rust-wasm-loader to compile and load Rust code as .wasm modules.
npm install --save-dev webpack
http-server rust-wasm-loader
Add a few helpful scripts to our package.json:
{
  "scripts": {
    "compile": "webpack --progress",
    "serve": "http-server"
  }
}
Create an index.html:
<!DOCTYPE html>
<html>
  <head>
    <title>Hello World</title>
  </head>
  <body>
    <div id="container"></div>
    <script src="build/bundle.js"></script>
  </body>
</html>
Create a webpack.config.js:
module.exports = {
  entry: './src/index.js',
  output: {
    filename: 'bundle.js',
    path: __dirname + '/build',
  },
  module: {
    rules: [
      {
        test: /\.rs$/,
        use: {
          loader: 'rust-wasm-loader',
          options: {
            // The path to the webpack output relative to the project root
            path: 'build',
          },
        },
      },
    ],
  },
  // The .wasm 'glue' code generated by Emscripten requires these node builtins,
  // but won't actually use them in a web environment. We tell Webpack to not resolve those
  // require statements since we know we won't need them.
  externals: {
    fs: true,
    path: true,
  },
}
Let’s add a function to our src/main.rs that we will call from Javascript:
fn main() {
    println!("Hello, world!");
}

// Functions that you wish to access from Javascript
// must be marked as no_mangle
#[no_mangle]
pub fn add(a: i32, b: i32) -> i32 {
    return a + b
}
Finally, we’ll write some code in src/index.js to load and use the WebAssembly module:
const wasm = require('./main.rs')

wasm.initialize({ noExitRuntime: true }).then(module => {
  // Create a Javascript wrapper around our Rust function
  const add = module.cwrap('add', 'number', ['number', 'number'])

  console.log('Calling rust functions from javascript!')
  console.log(add(1, 2))
})
Run these commands to compile and serve the project:
$ npm run compile
$ npm run serve
Navigate the browser to localhost:8080, open the Javascript console, and rest your weary eyes on the glorious output of our WebAssembly compiled Rust code!
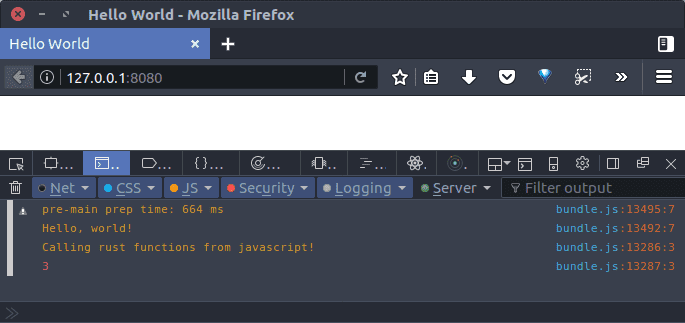
It’s happening!
We did it! Here is the finished project. I hope this tutorial helps you explore the exciting new world of WebAssembly. Below are some resources that I’ve found useful. Contact me on Twitter if you have any questions/comments/feedback/hate-mail.
Resources
-
The Path to Rust on the Web — This post has more in-depth usage examples.
-
webplatform — A Rust crate for interacting with the DOM.
-
mrdziuban/rust-emscripten-loader — rust-wasm-loader is a fork of this awesome project with small changes to the way modules are initialized. Check this loader out if you want the flexibility of choosing between asm.js and WebAssembly targets.